With the latest ZenPass update, practitioners can now manually book clients directly from their calendar — giving you more flexibility and control over your schedule. Whether you’re running a class, event, or one-on-one session, you can now add clients to time slots yourself, all within just a few clicks. If you’re just getting started with ZenPass, you can learn how to optimise your experience as a new practitioner here.
In this guide, we’ll walk through how to manually book clients for different session types, how pricing and packages are handled, and what your clients will receive once booked.
Why Use the “Book In Client” Feature?
Sometimes, clients don’t book themselves — they call, email, or tell you in person. Now you don’t need to rely on back-and-forth or external systems. Instead, you can:
- Add a client to your calendar in seconds
- Keep your records centralised and up to date
- Ensure clients still receive email confirmations, waivers, and reminders
- Track bookings even when done manually
- See accurate revenue and usage stats in your dashboard
It’s perfect for walk-ins, casual members, admin follow-ups, or when you want to secure a spot on behalf of someone.
How to Book In Clients on ZenPass
The way you book a client depends slightly on whether it’s for a class/event or a 1:1 appointment. Here’s how both processes work:
For Classes & Events
- Open Your CalendarHead to your calendar view in ZenPass.
- Click on the Desired SlotFind the class or event you’d like to book a client into, then click the session to open its details modal.
- Click the “+” ButtonYou’ll see a small “+” icon — click it.
- Fill in the Client Booking Form
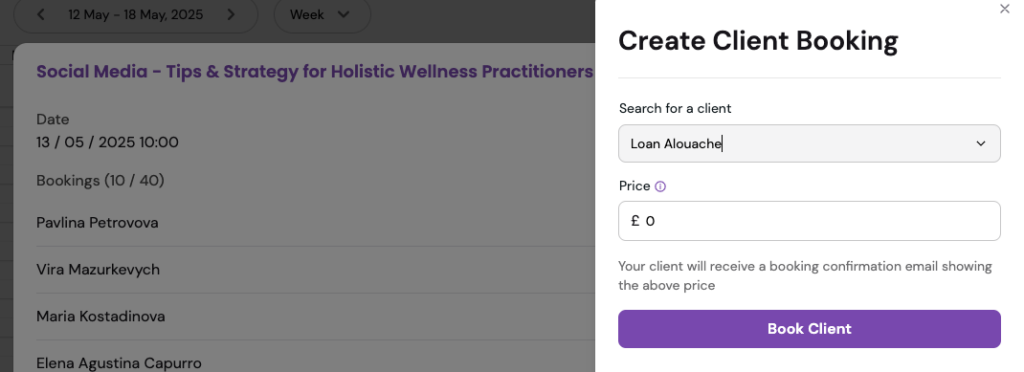
A form will appear where you can:
- Search or add a client
- Confirm the listing
- See or set the price
- Check if the booking is covered by a package
- Save the Booking: Once saved, the client will be added to that session, and notifications will be triggered automatically.
For practitioners working at full capacity, this feature supports greater efficiency — see how full-time wellness professionals streamline their bookings on ZenPass.
For 1:1 Appointments
- Open the CalendarNavigate to your calendar in ZenPass.
- Click “Add” > “Appointment”
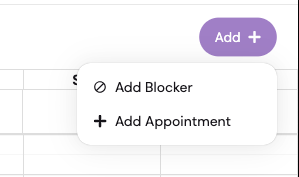
You’ll see an “Add” button on the calendar interface. Click it and select “Appointment”.
- Fill Out the Booking Form
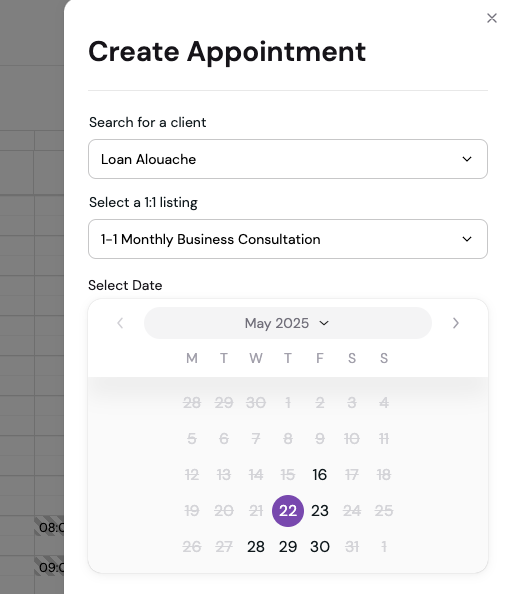
The form lets you:
- Select a client from your database
- Choose the relevant listing
- Pick a time slot
- Set or confirm the price
- Confirm and Save: Once saved, the booking will behave just like a standard online booking, triggering all the appropriate flows.
What Happens After You Book a Client?
When you use the “Book In” feature, the booking enters the exact same flow as any regular booking. That means:
- The client receives a booking confirmation email, including session details, location (if in-person), and price.
- You (the practitioner) will also get a confirmation.
- If applicable, the client receives:
- Waiver forms
- Calendar invites
- Email or SMS reminders
Note: If the client doesn’t have an email address on file, all notifications will be sent to the provider only.
This ensures you still have a clear paper trail and communication, even for manually added clients.
Pricing for Manually Booked Clients
When you add a client manually, you’ll be asked to enter a price. Here’s what you need to know:
- This price is not charged to the client.
- It’s used only for:
- Displaying the amount in the confirmation email
- Calculating total revenue in your ZenPass dashboard recaps
If the client has a valid package, the price will default to £0, and the system will automatically deduct a session from their package.
You’ll see a message like:
“Included in package: 10-Class Pass (Remaining: 7)”
So you’ll know it’s been covered by a package with no manual input needed. To understand how ZenPass pricing works for different plan levels and booking types, view our up-to-date pricing page here.
If they don’t have an active package, the price field will be pre-filled with the default listing price (which you can adjust manually if needed).
How Packages Are Handled
One of the biggest time-savers is that ZenPass handles packages automatically when you manually book in a client.
Here’s how it works:
- If the client has a valid package:
- The session will be deducted from their available balance
- The price will show as £0
- A message below the price will confirm it’s included in the package
- If the client does not have a package:
- The default listing price will appear
- You can edit the amount if you wish
There’s no need to manually manage package usage — ZenPass does all the tracking for you.
Final Tips
- Use this feature when a client contacts you directly, or if they’re having trouble booking themselves
- Keep your calendar updated by adding no-shows, late bookings, and ad-hoc sessions
- Be sure to check or adjust the price so your reports reflect accurate revenue data
- Let ZenPass handle the heavy lifting with package integration — no spreadsheets needed
Start Booking Clients Manually Today
The “Book In” client feature brings flexibility and ease to your scheduling routine. Whether you’re adding clients to events, group classes, or private appointments, you can now manage it all directly from your calendar — while still sending the right messages, tracking packages, and keeping your dashboard insights up to date.
Log in to your ZenPass account now and give it a try!
Need a hand getting started? Explore our Help Centre for step-by-step guides, FAQs, and tips to make the most of ZenPass.
Visit the Help Centre now and find the answers you need.
Leave a Reply