Buffer time is a valuable feature that allows you to create space between appointments, classes, or events on your ZenPass calendar. Whether you’re a wellness practitioner, coach, or therapist, buffer time helps you stay on track, avoid back-to-back sessions, and give yourself room to breathe.
In this guide, we’ll explain what buffer time is, why it’s essential for your practice, and how to easily add buffer time using your ZenPass dashboard.
What Is Buffer Time?
Buffer time refers to a short break that is automatically added before or after an appointment, class, or event. Think of it as a “transition period” – time you can use to prepare for your next session, take notes, reset the room, answer messages, or simply have a moment of rest.
For example, if you set a 15-minute buffer time after each session, your next booking will only be available 15 minutes after the previous one ends.
Why Buffer Time Matters
Adding buffer time is not just a convenience; it’s a best practice for any practitioner who wants to maintain a high standard of service and avoid burnout. Here are a few reasons why buffer time is important:
1. Professionalism & Punctuality
Buffer time helps ensure that you’re not running late for your next client. You’ll have time to wrap up the current session and prepare for the next one, which makes your business appear more professional and organised.
2. Improved Client Experience
Clients can sense when you’re rushed or stressed. With a short break in between, you can be more present and focused, creating a better experience for each individual.
3. Room for the Unexpected
Sessions often run a few minutes over, or clients may need extra attention. Buffer time gives you that cushion so you don’t feel pressured or have to cut them off abruptly.
To better manage your client flow and avoid burnout, read how part-time wellness practitioners use ZenPass to stay balanced.
4. Time for Admin & Notes
Use buffer periods to update your session notes, handle emails, take payments, or set up for your next client.
If you’re managing back-to-back appointments, our platform overview for full-time wellness professionals highlights tools to streamline your day.
How to Add Buffer Time in ZenPass
Adding buffer time to your calendar is simple and can be done in just a few clicks. You can choose to add buffer time after classes, events, or appointments – or all of them.
Here’s how:
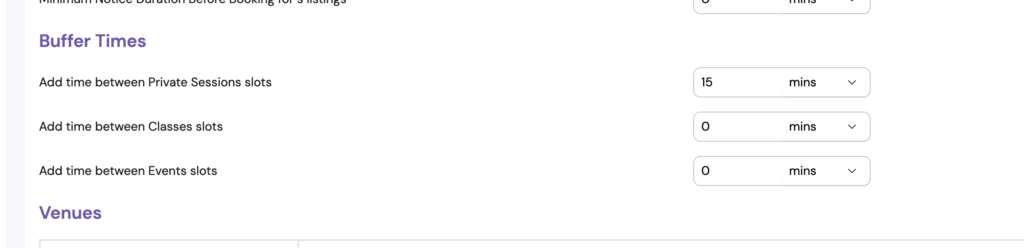
Step-by-Step: Adding Buffer Time
- Log in to your ZenPass DashboardHead over to ZenPass and sign in using your practitioner account.
- Go to SettingsFrom the main navigation menu, click on “Settings”.
- Select “Services”Within Settings, click on the “Services” tab. This is where all of your offered appointments, classes, and events are listed.
- Scroll to the “Buffer Time” SectionYou’ll find a field labelled “Buffer Time After”. This is where you can define how much downtime you need between sessions. The options are usually in 5-minute increments.
- Select Your Desired Buffer TimeChoose a value that fits your needs – such as 10 minutes, 15 minutes, or 30 minutes.
- Save Your ChangesClick “Save” to apply the buffer time to that specific service. Want to see how other practitioners structure their availability? Browse real service listings on ZenPass’s live booking directory.
Tip: You can add different buffer times for different services. For example, you might want 10 minutes after a 30-minute appointment but 20 minutes after a 90-minute class.
Frequently Asked Questions (FAQs)
Can I add buffer time before an appointment?
Currently, ZenPass supports buffer time after & before sessions. If you would like to see pre-session buffer times as a feature, feel free to reach out to our support team with your feedback.
Will clients see the buffer time on my calendar?
No – buffer time is for your internal use only. It blocks out the necessary time on your calendar so clients can’t book sessions too close together, but it won’t appear on their end.
Does buffer time affect how my availability is shown?
Yes. Buffer time shortens the number of bookable slots available on your calendar, helping to prevent overbooking and giving you better control over your schedule.
Best Practices for Buffer Time
- Test Different Durations: Start with 10–15 minutes and adjust based on how your day flows.
- Apply It to Your Most Demanding Services: Longer or more intensive sessions may need longer recovery or setup time.
- Use It for Mental Resetting: A short meditation or tea break during buffer time can go a long way for your energy levels.
Final Thoughts
Adding buffer time on your ZenPass calendar is a small step that can make a big impact on your workflow, energy levels, and client satisfaction. It’s about honouring your time, staying organised, and showing up fully present for every session.
To get started, simply head to Settings > Services and start adding buffer time to your offerings today.
Need help? Reach out to our support team anytime – we’re here to help you thrive.
Leave a Reply